Tuesday, 31 December 2013

Happy New Year...

As is tradition for me, I don't rest no matter the day, Christmas, New Years, I keep working. :)

I have nearly finished my Phoenix Wright model, and in about 3 days! I am very impressed at my determination, I had so much fun with modelling it. I will post a process picture in the New Year.

For now, I'm modelling the last part, the ear. I am terrible at modelling this ear...


 Grrr! Ears! Can't draw them, can't model them.

Also before I sign off, on my usual noseying at games industry job positions and requirments, I spotted a software some companies were after called Crazy Bump. I've downloaded the 30 day free trial, and put my rough colour Neku UV.png through it, and I'm doing it mostly by guessing, but oh wow! The results are too cool! But still early days, I need to really understand the texturing first.
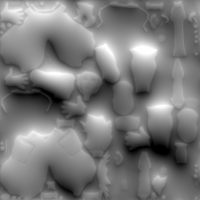
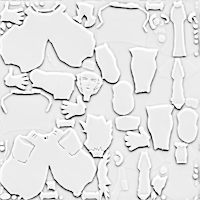


Maybe I could use it for my Phoenix Wright models suit? To create fibers? Or pores in the skin, or strands of hair effect? Too exciting...I'm really enjoying 3D. What a contrast from my fear of it, 3 months ago. Haha. :)

Signing off, happy new year to those following my blog and musings. Thank you.

Friday, 27 December 2013

Revisting Neku Model

Hope you all had a great Christmas, and aren't working through it like me. I can never seem to stop and chill.

Neku model update:

- I added a sweat band on his wrist. How on earth did I miss something like that?
- I had fully UV unwrapped him, but something went terribly wrong with the fingers. No matter what, texture didn't affect certain areas. I had to go and clean up normals and weird shapes in the model. The model was better, but still, no luck with fingers. So I abandoned the UV maps/rough textures I had done in the past few weeks, and with the help of HeadusUV software, redid my UV maps (which I can always submit too, as proof that I did do it by hand!)
- Rough textures layed on top. Messing around with it, like do I want it detailed, or any gradient, or thick black lines ontop of it?

So here's a screenshot with the rough textures...I think next I update, it'll be about textures and the final model :)


Also! I got to put it through Mixamo and see it animated. It was amazing to see my model come to life like that!! I can't wait to put the final model through :)

I have also started working on my Phoenix Wright model. I'm loving it, but regretting picking Phoenix, since he HAS a brand new 3D model. I have to make my 3D model suitable for home consoles...hmmm...

Until next time...

Wednesday, 18 December 2013

Eyes!!

Ah, update sooner than I thought! I went back to redo the eyes. It's been a struggle, but a semi sphere was just not going to look good. I've mentioned him before, but I noticed what Hazard did with his Miku model's eyes:


A flat plane with the image on top. I replicated this in Neku:


After UV and texturing, if it still doesn't look correct, I'll rethink what to do about it. :)

Cleaned and Smoothed

As title suggest, I've gone in and tried to clean up as much as possible. I'm very fond of the "Sculpt Geometry Tool", great for pinching, smoothing/relaxing, etc. Only problem I find with it is I wish it mirrored (and if it does, I didn't know!). Very difficult to get even parts sometimes.

worked further on face, and still not happy with chin area. But unsure what to do at this point.


Parts of the model have been smoothed, other areas I've left with hard edges. Especially hair spikes are hard. The 2D images of Neku feature thick bold black lines, and hopefully having hard edges in the right area and the textures will reflect a better 3D from 2D image of Neku. The black bold lines were excluded from Neku's Kingdom Hearts model (to fit the Kingdom Hearts style.)

The model has now been separated into pieces too, such as skin, face (so I can focus on that area separately), hair, eyes, belt, mp3, shoes, shirt, and trousers. Debating if I should have a separate one for the mouth bag inside, though I doubt I will have to.

From here on, I'm going to fix up the eyes (so they fit better) and then begin to UV and apply placeholder textures, until I like the look and begin to paint them.

Tuesday, 17 December 2013

Modelling + Hair

Neku model is now down, and now needs to be cleaned up of unnecessary shapes/edges, UVing, put some place-holder textures on, smoothed out, and a general all over cleaning up :) Not in that order though :)

While I'm very happy with how the hair turned out in the end (after redoing, the first attempt was too flat and incorrected. Started relooking at concept (2D) pictures of Neku, as well as how the Square Enix team tackled his hair in the Kingdom Hearts 3D game. Video reference: http://www.youtube.com/watch?v=6zTW5v_SCHI


I am worried at how many edges/tris there are in the hair. It's somewhat messy, and I'm scared to go into it. I may ask Ken for advice here....

Model currently:


Until next time!

Thursday, 28 November 2013

Feedback and Modelling the face

Me and Adam K. received our first email from one of our mentors this week, Sophia. I won't list our answers, but I will admit, we both did a thumbs up from across our desks. They were very informative!

With Neku's body mostly finished, I've started to tackle the face/head. I've been excited for the head for sometime now, and the last time I used Planner Modelling, I was very impressed with the results, wishing I had known of it sooner.

So, I was excited but wanted to this properly. So I firstly looked at different 3D heads, both anatomically correct models, anime models, and photos/gifs of a spinning head. So here is the image I took as a reference:

I then drew a simple image of Neku's face proportions, and placed it on top of the mesh image:


From here, I traced the topology from the original, and then began to change the proportions so I could find a compromise between the two face shapes: 

The final image was then placed on an Image Plane and I begun to model it!


I didn't take earlier shots unfortunately, but iterations taken as I've done this:

- Bridge of the nose topology; I shuffled afew poly's, one of the edge loops around the nose should have come round to form a cheekbone. I had missed this so fixed it now
- Nose; An odd anime shape, but alot of deformities were happening. Now fixed, but may need more attention later also.
- Flat face; I stuggled with making the face rounded from a 2D plane. Required (still working on it also) much patience, and using tools such as Soft Select and Sculpt Geometry.

Still struggling, but here is the most current version of the head. Getting the shape correct and trying to get the lips right are my biggest issues at the moment. :)


Friday, 22 November 2013

Mentors and Shoes

I neglected to mention earlier; I have been assigned 2 Mentors, along side fellow MProf colleague Adam K. Our mentors are Sophia George (Game Design Resident at V&A Dundee) and Zoltan Fejes (Game Designer, Blitz Game Studios)

We've made contact, and about to send off our first batch of questions. I will not post answers, but here are Adam and I's collective questions:

Adam
  • Generally as a designer, what tools should I be able to utilize in order to provide a concept, for example Zbrush/Maya?
  • How quickly and often do you find you need to be able to use 3D modelling in order to show someone your vision?
  • What are some of the pitfalls when designing a level?

Ceren
  • How did you personally enter the industry
  • When do you feel confident enough about a 3D model to put into a videogame?
  • What do you personally think is tricky/a rookie mistake when it comes to character modelling for games?

A new problem today, is floating geometry allowed? (e.g. buckles that are floating on a shoe? Does it have to be connected??) I might ask a friend, Danny S., who is a talented 3D modeler in the industry for his advice on it.


Thursday, 21 November 2013

Faster!

Today's progress; Cleaned up some haywire polys on finger/fingernails, have an earphone ready, belt modeled and attached to model, and shoes! Very happy.


I'm happy to say I have got head and hair left to model, before I go into details and further tweaking.

I'm also grateful I have my friend Robin G. on Masters with me, her area of specialty is technical 3D animation. So I often pester her to make sure the model/edge-loops are correct for rigging/animation/ready to be implemented into a game. :)

Wednesday, 20 November 2013

5th time lucky

I really lack confidence when it comes to 3D modelling. I am therefore very lucky my fellow students are good at it, and share some great tips with me, or features I was unaware of in Maya that can speed up work progress.

Of course, practice comes in a lot too, and I've been paying close attention to Digital Tutorials videos and friends when they show me how to do something (I then delete what they've shown me or screen cap it as reference and attempt my own version. I find this an easier way to learn!)

My 5th attempt at the baggy trousers of Neku, this will be the one I will continue to work on. Happy with the current shape/silhouette. Reasons for reattempts are: Not true to the 2D shape, shape did not look correct for animation, too many/too few polygons/a mess, and not having the right edge loops.


Also with the help of Mike N. and Digital Tutors, I conquered hands!


I understand my progress is slow, and needs much improvement, but with every iteration I feel more confident in myself in maybe producing better models. :)

Friday, 1 November 2013

Neku Iteration...

Just an update into my process. I keep finding new faults or thinking of a different way of tackling things. I'm saving out loads of different versions of the model, and I usually go with the alternative method version!

Iterations include:

- Legs, how they were extruded. Old screenshot, this version was changed.


- Model. I changed from modelling nude, to modelling clothes on top.
- Shirt, made it flair out instead of being a painted texture on top of his body.


- Hood. So many random, hiding faces, I thought I'd just glue it onto the top and I'll add depth with texture?


Until next time...

Thursday, 31 October 2013

Phoenix Wright / "How Many Polygons?"

For my next model, I'm wanting to do something more realistic. I don't trust my abilities enough to say 'hyper-realistic',  but I'll be aiming for a character that is of the same quality of say Nathan Drake (Uncharted 3. PS3. 30,000 poly count), Lightning (Final Fantasy XIII. PS3/XBox360. 8,488 poly count) or Dante (DmC: Devil May Cry. PS3/Xbox360/PC. 20,732 poly count)

To others following this blog who also struggle with my favourite question of "But how many polygons?", or who want a reference to follow, here is a fantastic thread of some games characters poly counts: http://forum.beyond3d.com/showthread.php?t=43975

But going back to what my main goal is, it's the transition of 2D to 3D. I've always enjoyed handheld games, and I'm strongly considering making a realistic Phoenix Wright, from the Ace Attorney: Phoenix Wright series. The game original began on GBA in Japan in 2001, and after many installments of the game, it released it's first 3D graphics version on July 2013 (Japan). The game is low poly - for the 3DS - but matches the iconic 2D sprites:

Here is a screenshot of the game in development; An awfully different representation/style than the 2D art (with the new one below it for comparision):


Obviously this style was scrapped. Phoenix Wright's 3D debut however was in the game Ultimate Marvel vs Capcom  3 (2011):


I'll be studying the model, downloading it here: http://ik1l73r.deviantart.com/art/UMVC3-Phoenix-Wright-401814420. I also managed to download a fan made Brawl model to study.

This will be after my Neku model!

Article 'Why turning 2D to 3D wasn't easy' and how they had a minimum of 3 different models for Phoenix Wright to correctly portray him (as in his 2D) angles: http://www.siliconera.com/2013/07/31/going-3d-with-ace-attorney-dual-destinies-was-not-a-simple-process/

Very early stages of Neku

So starting with Neku, and approaching it very carefully. I'm also lucky one of good friends in Masters is a great 3D Animator, and when something doesn't look quite right I tend to ask for her opinion on edge loops (specifically around the leg and arm, right now!)

My progress is very slow, and below is 2 full days work. But I'm hoping with practice I speed up. :)

I'm unhappy about the shape of the legs too, but don't know yet how to tackle a solution...


Wednesday, 23 October 2013

Focusing on 2D to 3D modelling

The biggest challenge I face with this module is to model a character from 2D to 3D that isn't my own design. Challenges that come with this: It has to look true to it's 2D style, I can't change the design given to me (due to poor skills or time saving), and I can't change the 'feel' of the character to match my style whatsoever.

I think I'll find some leniency along the way, but for now, I think it's important to ingrain these thoughts so I don't stray off into design. :)

I have decided to do 3 characters in High and Low Poly. I want them to be very defined 2D characters, so I can translate that into 3D. I've still to decide on them all, but thinking towards one anatomically correct human character, one cartoon-style, one cartoon/creature.

I've been looking at (for my cartoon-style), the game The World Ends With You (2008) by Square Enix. A 2D DS game, it was inspired by graffiti art:


Fans speculated as to how the game would look in 3D. In 2012, the cast of TWEWY debuted in 3D in Kingdom Hearts: Dream Drop Distance. However, they abide by the Kingdom Hearts style rather than being true to their chunky lined style:


For this reason, I find it would be a good example to model into 3D following the art of the 2D. I'm not sure how to achieve this result, yet, but looking very forward to learning. Every character I model will present it's own challenges. :)

I'm looking forward to finding out who my Mentor is, and get advised. I'm also following Digital Tutor videos, which are amazing!

Next update I hope to have more ideas of who else I'd like to tackle to model.

Tuesday, 22 October 2013

Reiterate

Week 5, and only now do I fully understand. I'm frustrated at myself for not picking it up sooner, but happy I'm finally ready to model. A key factor I've cleared up today is modelling NOT designing. :)

Here is my PDP:

--------------------------------------------


Student Name

Ceren Gunes

Core Discipline

Artist

Area of Enquiry

Character modelling for video games


Agreed Action Points

- To model 3 humanoid characters ready to be implemented into a game. This means it's polished and ready to be rigged/animated.
- Document progress in a form of a blog
- Communicate with my mentors and peers in progressing my modelling skills

Agreed Deliverables

- PDF version of blog including progress shots
- Abridged transcripts between myself and my mentors
- 3 High Poly and Low Poly .OBJ versions of the character model
o   All will be textured, and posed, submitted as a .PNG
o   All will be animated through Mixamo submitted as a video


----------------------------------------------

Friday, 11 October 2013

Update to agreed deliverables

After today's meeting, a few misunderstandings have been cleared up. I'm no longer doing a vehicle and environment, and am sticking to character design, as well as an item/weapon of some sort. I'll be sticking to the MMO-RPG feel for the character. Will upload sketches soon.

Have also placed a request for software to aid this project to the University. Fingers crossed! :)

Friday, 4 October 2013

Feel of Character

I'm pretty sure I want to go down the "MMO-style models" for my final pieces. It's still early days, so all I can do is sketch and look up models I like, and mess around with Maya and watch Digital Tutor videos.

I really want to create a fantasy style female, an unconventional looking vehicle, and I'm undecided for environment because it's where I'm weakest. I created a moodboard of only existing MMO, mostly 3D, characters. I want to properly look at other medias when I'm doodling, and into fashions too (lolita and armour are top on my list). I also want to challenge this female/armour debate...but that is, if I go down the route of armour/warrior class, etc


Also friend of mine pointed me to HazardousArts on dA (http://hazardousarts.deviantart.com/) over the Summer, and his work is stunning. Definitely my biggest motivator this semester! Love the progress shots just as much as the final model.

Introduction and Personal Development Proposal

Hello, I'm Ceren Gunes studying my Masters in Games Development. I'm setting up this blog to document my progress through my module AG1140A - Low Poly Modelling. I'll be submitting this blog at the end for submissions as a PDF.

I'm very excited to start this module. As a brief backstory, I am mostly a 2D artist, and love to digitally paint illustrations, doodle, and come up with character concepts. But I've always been intimidated by 3D and it's never gone as I've wanted. Over the Summer, I've aimed to get rid of the fear and be left with excitement. I've been using software such as: Maya, ZBrush, Topogun, UV Unwrapping, etc. It's been fun, and very challenging/frustrating. For this module however, I'm restricted to Maya and Photoshop.

Because of this, I'm eager to achieve this module:

- Model 3D characters that are high quality and ready to be implemented into a game
- Learn features of Maya I've never used to create high quality models
- Become a better artist/modeler and have a better understanding of what to expect through my mentor

I have a few ideas, and hope to load up some sketches in the following weeks. :)

I hope you enjoy my progress and the models I'll create.